OffGallery
1What is OffGallery
OffGallery is a fully offline photo cataloguing and retrieval system. It automatically analyses every image using local AI models, generating semantic embeddings, biological taxonomy, tags, descriptions and aesthetic scores — without sending a single pixel to any cloud service.
It is designed for photographers managing archives of thousands of RAW files who want to find any photo in seconds using natural language: "backlit portrait at sunset", "grey heron in flight", "snow-covered mountain landscape".
What OffGallery can do
- Analyse 25+ RAW formats (Canon CR2/CR3, Nikon NEF, Sony ARW, Fuji RAF and more) and standard formats (JPG, PNG, TIFF, WEBP, HEIC)
- Generate SigLIP semantic embeddings (1152 dimensions) for multilingual natural language search
- Compute DINOv2 embeddings (768 dimensions) for visual similarity search
- Automatically classify flora and fauna with BioCLIP2 (~450,000 species, 7 taxonomic levels)
- Generate tags, descriptions and titles via a local LLM Vision model (e.g. Qwen3-VL via Ollama or LM Studio)
- Evaluate artistic quality with an aesthetic score (0–10) and technical quality (sharpness/noise)
- Offline-geocode GPS coordinates to a Continent › Country › Region › City hierarchy
- Integrate with Lightroom via bidirectional XMP import/export
- Process Lightroom .lrcat catalogs directly as input source
No data, image or metadata ever leaves your computer. All AI models run locally. An internet connection is required only on first launch to download the models (~6.7 GB).
2First Launch
Windows: after running OffGallerySetup.exe, launch OffGallery using the shortcut created on the Desktop. Linux/macOS: use the corresponding launcher (see installer/INSTALL_GUIDE_EN.md). On first launch, the application automatically downloads the AI models (~6.7 GB total). A progress panel shows the download status. This happens only once.
Windows: double-click the OffGallery shortcut on the Desktop, created by
OffGallerySetup.exe. Linux/macOS: use the launcher script in theinstaller/folder.On first launch a splash screen appears while downloading the AI models. An internet connection is needed only at this point.
Once the download completes the main interface appears with 8 tabs.
(Optional) Make sure Ollama is running if you want to generate LLM tags and descriptions. On Windows start the Ollama app; on macOS/Linux the daemon starts automatically.
From the second launch onwards OffGallery is completely offline. No internet connection is needed.
3Interface Overview
The interface is organised into 8 horizontal tabs at the top of the window:
| Tab | Main Function |
|---|---|
| Configuration | AI model settings, LLM, UI and output language, external editors |
| Processing | AI analysis of images: embeddings, BioCLIP, LLM, aesthetic/technical scores, geotagging |
| Search | Natural language semantic query + EXIF/score/date/colour filters |
| Gallery | Display results with badges, preview and advanced sorting |
| Export | XMP export, file copy with original structure, Lightroom sync |
| Statistics | Database analysis: format breakdown, dates, lenses, scores, ratings |
| Log | Real-time monitoring of processing tasks |
| Plugin | Standalone plugin management: launch, configure and monitor progress |
3.1 Model Status Indicators
In the top-right corner of the main window there is a fixed bar with coloured indicators for each AI component. At a glance you can verify what is active without opening Configuration.
| Colour | Meaning |
|---|---|
| ● Green | Component loaded in VRAM (GPU) — optimal performance |
| ● Amber | Component loaded on CPU — working, optimal for lightweight models (DINOv2, MUSIQ) or as fallback for heavy models when VRAM is insufficient |
| ● Red | Component enabled but not loaded — loading error (e.g. model not found, VRAM exhausted without fallback) |
| ● Grey | Component disabled in configuration |
Monitored components: CLIP, DINOv2, BioCLIP, Aesthetic, Technical (MUSIQ), LLM Vision, ExifTool and Database.
Note: The indicator colour reflects the configured device for each model. With per-model allocation (see Device section), some models may intentionally run on CPU (amber) to leverage thread parallelism. BioCLIP has an automatic CPU fallback if VRAM is insufficient.
The LLM indicator shows the name of the detected backend (Ollama or LM Studio) and refreshes automatically every 30 seconds. With the backend set to auto (default), OffGallery automatically detects which server is running with no manual configuration needed.
4Processing Tab

The Processing tab is OffGallery's operational centre. This is where you launch AI analysis sessions that populate the database with embeddings, tags, descriptions and metadata.
4.1 Image Source
At the top of the tab you can choose between two source types:
Source: Directory
Default behaviour. OffGallery scans the selected folder (and all sub-folders) for all supported formats. Use the Browse button to pick a directory, or type the path manually.
The INPUT/ folder in the OffGallery root is the default destination. Copy new photos here to process them.
Source: Lightroom Catalog (.lrcat)
Select a Lightroom .lrcat file directly. OffGallery reads the catalog read-only via SQLite, extracts the full list of indexed files (with absolute paths) and uses them as the source — the original catalog is never modified.
This approach is ideal for:
- Processing your entire Lightroom library without moving files
- Preserving the original multi-disk folder structure
- Enriching the Lightroom catalog with OffGallery-generated tags and descriptions
If Lightroom has the selected catalog open, OffGallery can still read it (read-only access). The catalog is never modified.
4.2 Processing Mode
Three modes selectable via radio buttons:
| Mode | Behaviour |
|---|---|
| New images only | Processes only images not yet in the database. Already-analysed photos are skipped. |
| New + previous errors | Processes new images and retries those that encountered an error in a previous session. |
| Complete / Reprocess all | Processes all photos (new and already catalogued). With Overwrite OFF: adds only missing data — ideal for completing an interrupted import or applying a model that was not active last time. With Overwrite ON: recalculates everything from scratch. Selecting this mode reveals the AI Gen. Only checkbox: see § 4.4. |
4.3 AI Options (LLM Generation)
The AI Generation panel controls the LLM Vision model behaviour:
| Option | Description | Default |
|---|---|---|
| Generate Tags | Enable keyword generation for each image | On |
| Generate Description | Enable narrative description generation | On |
| Generate Title | Enable short title generation | On |
| Max tags | Maximum number of tags to generate | 10 |
| Overwrite | If selected, overwrites existing tags/description/title. If not selected: tags are merged (only new ones added); description and title are skipped if already present. | Off |
Grid: effect of Overwrite per field type
| Field | Overwrite OFF (default) | Overwrite ON |
|---|---|---|
| Tags | Merge: adds only tags not already present (case-insensitive). Existing tags are unchanged. | Full replace: all existing tags are replaced with the ones generated by the LLM. |
| Description | Skip: if a description is already present in the DB, the LLM is not called for this field. | Always generate: overwrites the existing description with the LLM output. |
| Title | Skip: if a title is already present in the DB, the LLM is not called for this field. | Always generate: overwrites the existing title with the LLM output. |
| SigLIP/DINOv2 embeddings | Skips photos that already have it in the DB. | Recalculates even if already present. |
| BioCLIP taxonomy | Skips photos that already have it in the DB. | Recalculates even if already present. |
| Aesthetic / technical scores | Skips photos that already have them in the DB. | Recalculates even if already present. |
With "Overwrite" off, the merge is case-insensitive: if the database already contains "Bird" and the LLM generates "bird", the tag is not duplicated.
Combined grid: Mode × Overwrite
| Mode | Overwrite | Tags | Description | Title | Embeddings / BioCLIP / Scores |
|---|---|---|---|---|---|
| New images only | OFF | Merge (new tags only) | Skip if present | Skip if present | New images only |
| ON | Full replace | Always generate | Always generate | ||
| New + previous errors | OFF | Merge (new tags only) | Skip if present | Skip if present | New or previously failed images only |
| ON | Full replace | Always generate | Always generate | ||
| Complete / Reprocess all | OFF | Merge (new tags only) | Skip if present | Skip if present | Only if missing from DB |
| ON | Full replace | Always generate | Always generate | Always regenerated | |
| Complete / Reprocess all + AI Gen. Only | OFF / ON | Merge / Replace | Skip / Generate | Skip / Generate | Not touched (EXIF, embeddings, BioCLIP, scores skipped) |
4.4 "AI Gen. Only" Mode
The AI Gen. Only checkbox appears beside "Reprocess all" when that mode is selected. Checking it activates a special mode that operates only on LLM generation.
This mode is designed for a very common scenario: you have already analysed your photos but want to update tags, descriptions and titles using a better LLM model, without re-running the full pipeline (EXIF, CLIP/DINOv2 embeddings, BioCLIP, aesthetic score, etc.).
What "AI Gen. Only" does
- Filters to only images already in the database (new photos are ignored)
- Extracts a 512px thumbnail from the original for the LLM
- Calls the LLM Vision model with the configured prompt
- Updates only
tags,descriptionandtitlefields in the database - Skips completely: EXIF extraction, CLIP/DINOv2 embeddings, BioCLIP, aesthetic/technical scores, geotagging
What "AI Gen. Only" does not do
- Does not touch the
bioclip_taxonomyfield (remains unchanged) - Does not update embeddings (existing semantic searches remain valid)
- Does not process new photos not yet in the database
When to use it
- You have updated Ollama to a more capable model (e.g. from 4B to 7B)
- You want to regenerate tags in a different language
- The tags generated with the previous model were unsatisfactory
- You want to add descriptions to already-imported photos that have none
Select at least one of "Generate Tags", "Generate Description" or "Generate Title" before starting in AI Gen. Only mode. Otherwise OffGallery shows a warning.
4.5 Run and Monitor
Press the Start button to begin processing. During analysis:
- A progress bar shows advancement (current file / total)
- The Log panel (Log tab) shows every operation in real time
- The button changes to Stop to safely interrupt processing
Both completed and user-interrupted runs are safe: the database is updated after each completed image.
You can switch to other tabs (Search, Gallery) while processing is running. The process continues in the background.
5Search Tab
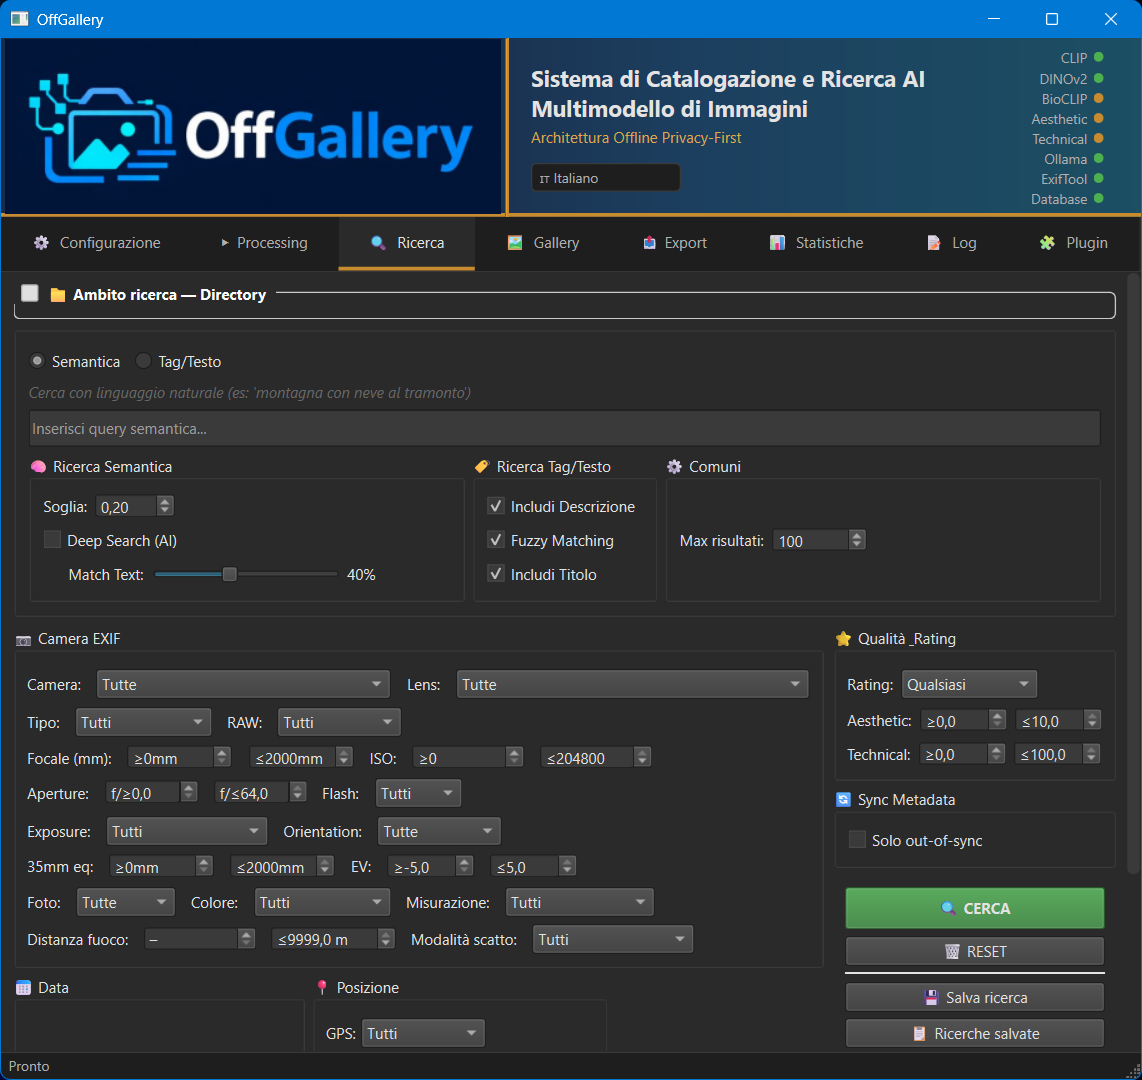
The Search tab is the heart of photo discovery. It combines semantic search (natural language) with advanced filters on metadata, scores and dates.
5.1 Semantic Search (SigLIP)
Semantic search uses SigLIP embeddings to find images whose visual content is similar to the concept expressed in the query, regardless of the exact words used.
Type a query in natural language: e.g. "sunset over the sea with boats". SigLIP is multilingual — you can type in Italian, English or any other language without translation.
OffGallery encodes the query directly with the SigLIP model (google/siglip-so400m-patch14-384).
Results are ranked by cosine similarity with all embeddings in the database.
Adjust the Threshold slider to filter low-relevance results (default ~0.20).
Write descriptive queries about the visual content: "bird in flight against a blue sky" works better than just "heron" (too generic). Include colours, atmosphere, and composition clues.
5.2 Tag Search
Tag search uses fuzzy matching to find images containing specific keywords. The search is:
- Case-insensitive: "Bird" and "bird" are equivalent
- Fuzzy: finds near-matches even with small spelling differences
- Multilingual: works in the language in which tags were generated
Combine multiple tags separated by commas for an AND search.
5.3 Advanced Filters
Filters are cumulative: enabling more than one progressively narrows results.
| Category | Available Filters |
|---|---|
| EXIF | Camera (make/model), Lens, Focal length (mm), ISO, Shutter speed, Aperture (f/) |
| Score | Minimum aesthetic score (0–10), Minimum technical score (0–10) |
| Rating | Lightroom stars: 0 to 5 (compatible with XMP import/export) |
| Colour | Colour label (red, yellow, green, blue, purple) or automatically-detected Black & White |
| Date | Capture date range (from → to) |
| Format | RAW only, JPEG only, or all |
| Location | City or region with autocomplete from values in the DB (GeoNames plugin). Contains-search, case-insensitive. |
| GPS | 4 states: All · GPS only · GPS manually modified · No GPS (GeoNames plugin) |
| Common name | Filter by biological common name with autocomplete (BioNomen plugin). Contains-search on the field. |
| Habitat | ESA WorldCover habitat type (forest, shrubland, grassland, urban, water…) — NaturArea plugin |
| Protected area | Free text on the WDPA protected area name — NaturArea plugin |
| Weather condition | Clear · Partly cloudy · Cloudy · Fog · Drizzle · Rain · Snow · Thunderstorm — Weather plugin |
The Location, GPS, Common name, Habitat, Protected area and Weather condition filters are visible only when the corresponding plugin is installed and has already processed at least one photo. If the plugin is absent, the row does not appear in the interface.
5.4 Saved Searches
You can save the complete configuration of a search (query + all active filters) with a custom name. Saved searches can be recalled in one click from the drop-down menu.
Configure the desired search (query, threshold, filters).
Click Save search and assign a name.
To recall it: select it from the "Saved searches" drop-down and press Load.
Searches are saved in database/saved_searches.json.
6Gallery Tab
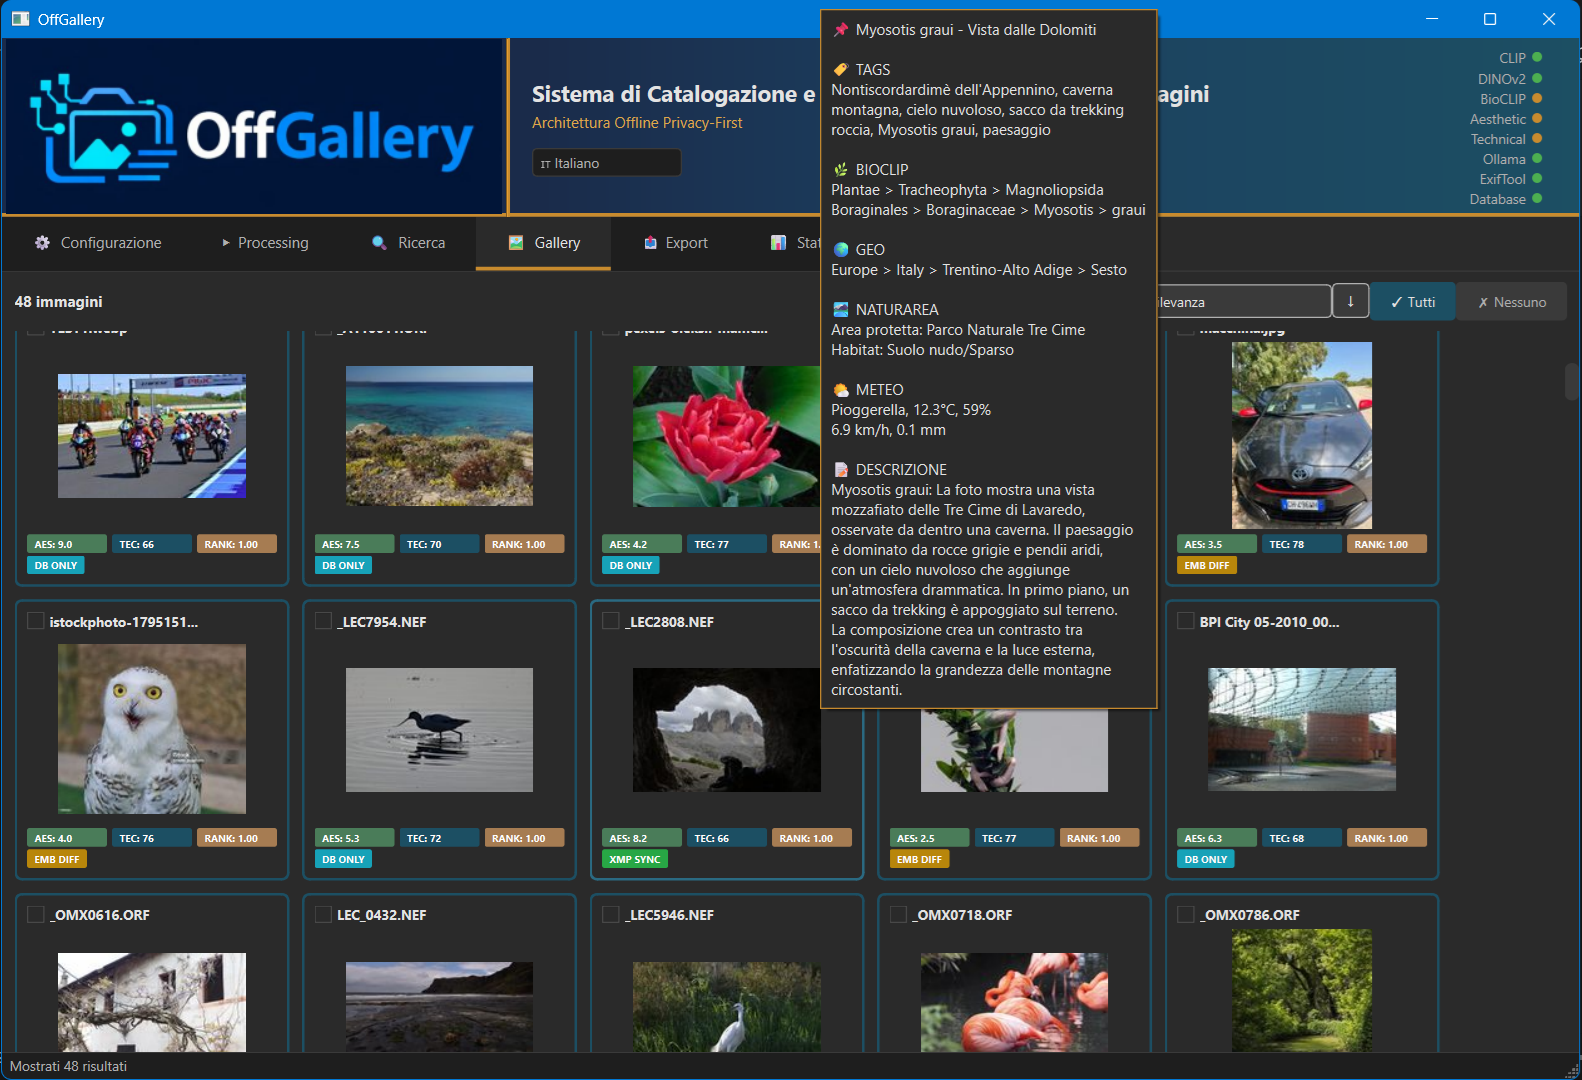
The Gallery displays the results of the current search. Each image is shown as a thumbnail with informational badges overlaid.
6.1 Badges and Indicators
| Badge | Meaning |
|---|---|
| ★ 4.2 | Aesthetic score (0–10). Colour: green >7, yellow 5–7, grey <5 |
| ⚙ 8.1 | Technical score (sharpness/noise, JPEG/PNG only) |
| ★★★★ | Lightroom star rating (1–5) |
| B&W | Black-and-white image detected automatically |
| ● | Lightroom colour label (red/yellow/green/blue/purple) |
Hover tooltip
Hovering over a thumbnail shows a tooltip with:
- LLM-generated title and description
- Full tag list
- BioCLIP taxonomy (if detected): e.g. Animalia › Aves › Ardeidae › Ardea cinerea
- Geographic hierarchy: e.g. GeOFF | Europe | Italy | Sardinia | Oristano
- Key EXIF metadata (camera, lens, ISO, shutter)
6.2 Sorting
The Sort by menu offers 7 criteria:
- Relevance (CLIP similarity score — default for semantic searches)
- Capture date (ascending or descending)
- Filename
- Star rating
- Aesthetic score
- Technical score
- Composite score (aesthetic + technical)
Each criterion supports ASC or DESC direction.
6.3 Context Menu
Right-clicking any thumbnail opens the context menu with available actions:
| Action | Description |
|---|---|
| Open in external editor | Opens the original file in Lightroom, Capture One, or another configured editor |
| Show in file manager | Opens the folder containing the original file |
| Find similar images | Starts a visual similarity search (DINOv2) using this image as the query |
| Edit tags | Opens an inline editor to add/remove tags manually |
| Regenerate AI | Regenerates tags, description and title for this single image |
| Export XMP | Immediately exports the XMP sidecar for this image |
| GeoNames → | GeoNames plugin submenu: Assign location… (opens dialog with name search or direct coordinate entry), Recalculate GPS hierarchy, Clear GPS data. Visible only when the plugin is installed. |
| Run NaturArea | Detects protected area and habitat from the GPS location (NaturArea plugin) |
| Run Weather | Retrieves historical weather conditions at time of capture (Weather plugin — requires internet) |
| Run BioNomen | Adds common biological names in the configured language (BioNomen plugin) |
Plugin entries appear in the context menu only when the corresponding plugin is installed. Actions apply to the selected image. To process multiple images in batch, use the Processing tab.
7Statistics Tab
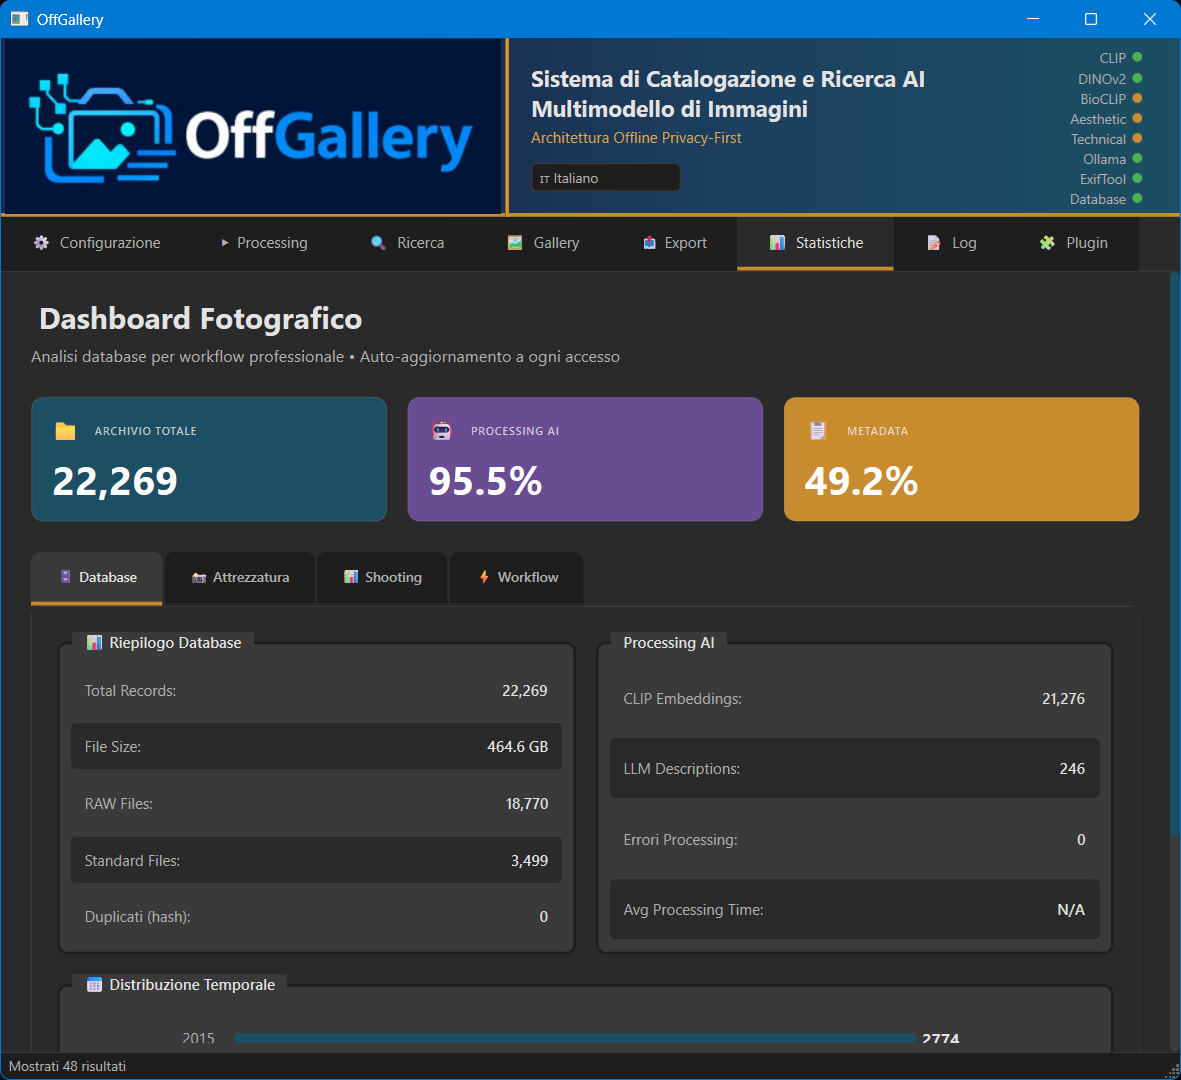
The Statistics tab provides an analytical overview of the entire indexed archive:
- Format distribution: how many RAW, JPEG, PNG, etc.
- Shooting timeline: temporal distribution by year/month
- Gear: most-used cameras and lenses
- Shooting parameters: ISO, shutter speed and aperture distributions
- Aesthetic and technical scores: histograms and averages
- Ratings: star distribution 0–5
- Tag cloud: most frequent keywords in the archive
8Export Tab
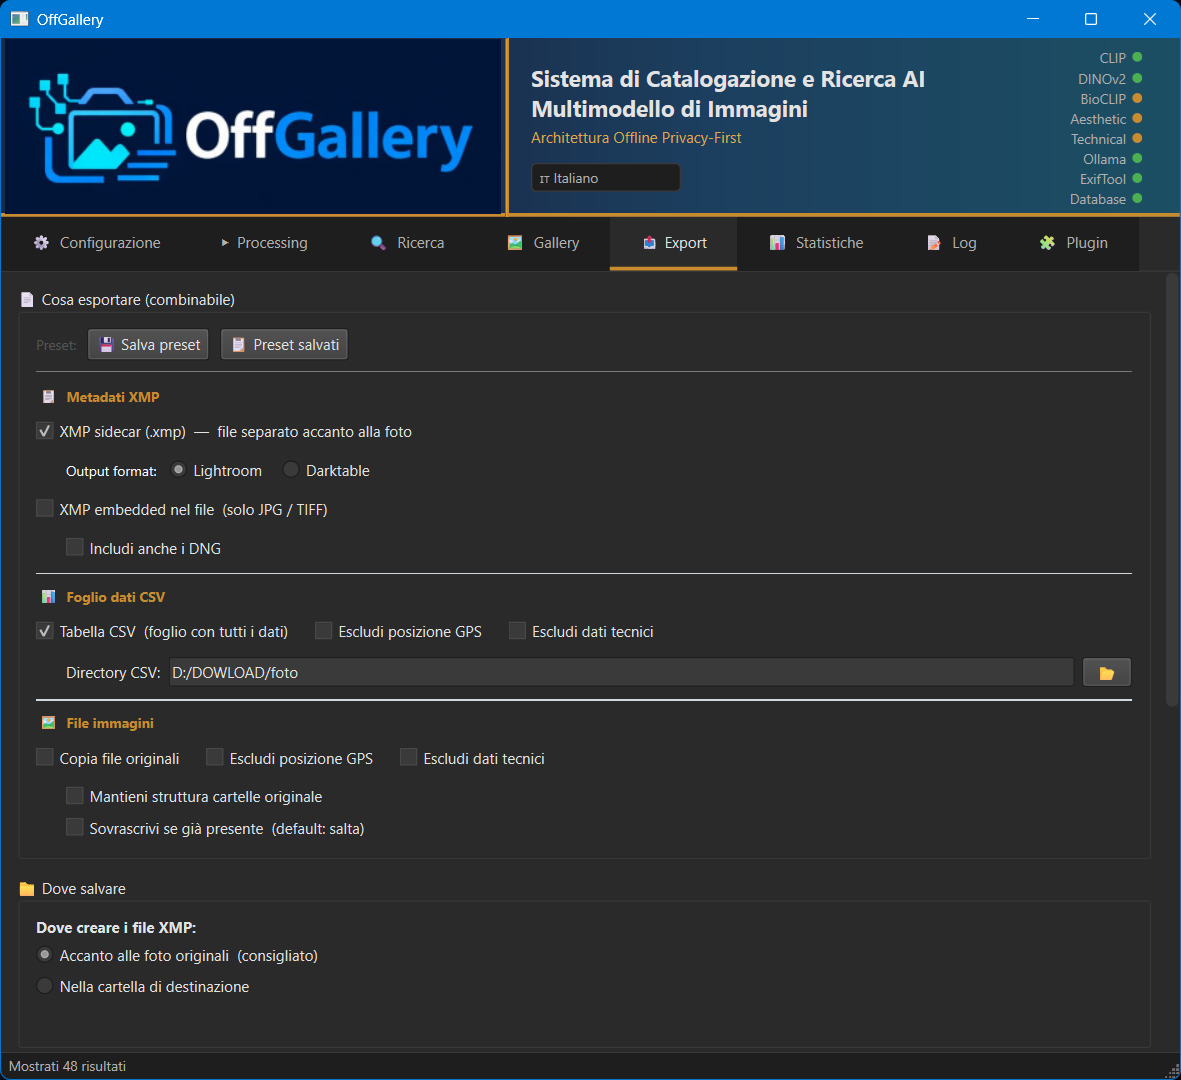
The Export tab is organised into three distinct sections — XMP Metadata, CSV Data Sheet and Image Files — which can be combined freely. At the top of the panel you'll find the Presets bar for saving and recalling complete configurations.
8.1 Export Presets
The entire tab configuration (all active flags, advanced options) can be saved with a name and recalled later.
- 💾 Save preset: saves the current configuration with a name of your choice. If the name already exists, you are asked whether to overwrite.
- 📋 Saved presets: opens the list of saved presets. Double-click or press Load to apply; press Delete to remove.
The last configuration used is remembered automatically: next time you open the tab, the same options are pre-selected. Presets are stored in database/saved_exports.json.
8.2 XMP Metadata
Writes .xmp sidecar or embedded files compatible with Lightroom, DxO, Capture One and any software that respects the XMP/IPTC standard.
| Option | Description |
|---|---|
| XMP Sidecar | Separate .xmp file alongside the original |
| XMP Embedded | Metadata written directly into the image file |
| Include DNG | Allows embedded XMP in DNG files (disabled by default for safety) |
Exported fields include: user and LLM tags (dc:subject), BioCLIP taxonomy (lr:hierarchicalSubject with prefix AI|Taxonomy|), geographic hierarchy (GeOFF|), star rating, LLM description and title. Plugin data (habitat, protected area, weather, common name) is written as additional XMP fields when present.
Grid: XMP fields exported by data type
| Data | XMP field | Standard | Visible in Lightroom as |
|---|---|---|---|
| User + LLM tags | dc:subject | Dublin Core | Flat keywords |
| BioCLIP taxonomy | lr:hierarchicalSubject | Lightroom | Hierarchy AI > Taxonomy > ... |
| Geographic hierarchy (GeoNames) | lr:hierarchicalSubject | Lightroom | Hierarchy GeOFF > Europe > Italy > ... |
| LLM description | dc:description | Dublin Core | Caption / Description |
| LLM title | dc:title | Dublin Core | Title |
| Star rating | xmp:Rating | XMP Basic | Stars 1–5 |
| Colour label | xmp:Label | XMP Basic | Colour label |
Grid: XMP import → DB behaviour
| Field in XMP file | Imported? | Notes |
|---|---|---|
Tags (dc:subject) without special prefix | ✅ Yes | Merged into existing DB tags (case-insensitive) |
Tags with prefix AI|Taxonomy| | ❌ No | Filtered: BioCLIP taxonomy is managed internally only |
Tags with prefix GeOFF| | ❌ No | Filtered: geographic hierarchy is managed internally only |
Star rating (xmp:Rating) | ✅ Yes | Updates the star field in the DB |
Colour label (xmp:Label) | ✅ Yes | Updates the color_label field in the DB |
Description (dc:description) | ✅ Yes | Updates the description field in the DB |
Title (dc:title) | ✅ Yes | Updates the title field in the DB |
| Proprietary namespaces (Darktable, Capture One…) | ⚠️ Preserved | Copied into the new XMP without interpretation — no proprietary data is lost |
Grid: XMP output format by photo editor
| Editor | Sidecar format | Option in OffGallery | Notes |
|---|---|---|---|
| Lightroom | filename.xmp | Output format: Lightroom | Sidecar alongside the RAW, standard convention |
| Darktable | filename.EXT.xmp | Output format: Darktable | E.g. IMG_001.NEF.xmp — double extension |
| Capture One | filename.xmp | Output format: Lightroom | Reads the standard Lightroom format |
| digiKam / ACDSee / FastRawViewer | filename.xmp | Output format: Lightroom | Compatible with the standard format |
XMP destination
Choose between Next to original (the .xmp is created in the same folder as the RAW) and Single folder (all XMP files written to a folder of your choice).
8.3 CSV Data Sheet
Exports a complete CSV file with all database metadata (46 fields: file data, camera, lens, exposure settings, dates, GPS, AI scores, tags, etc.).
| Option | Description |
|---|---|
| Exclude GPS | Omits GPS columns from the CSV (coordinates, city, country) |
| Exclude EXIF | Omits technical EXIF data (camera, lens, exposure, ISO, flash, etc.) |
Both options are disabled by default: the CSV includes everything. Columns remain present in the file even when excluded (fixed schema), but values are empty — useful for importers expecting a predefined schema.
8.4 Image Files
Copies original files to a destination while preserving the original folder hierarchy, even when photos come from different disks.
| Option | Description |
|---|---|
| Exclude GPS | Removes GPS tags from the copy via ExifTool. The original is never modified. |
| Exclude EXIF | Removes all EXIF metadata from the copy (camera, lens, settings). The original is never modified. |
| Preserve structure | Recreates the original folder hierarchy at the destination |
| Overwrite existing | Overwrites files already present at the destination |
Example with photos on two disks:
Source:
  C:\Photos\2024\Sardinia\IMG_001.NEF
  D:\Archive\2023\Tuscany\DSC_999.NEF

Destination (e.g. E:\Backup):
  E:\Backup\C_drive\Photos\2024\Sardinia\IMG_001.NEF
  E:\Backup\D_drive\Archive\2023\Tuscany\DSC_999.NEF
On macOS the prefix uses the volume name, on Linux the mount point.
9Configuration Tab
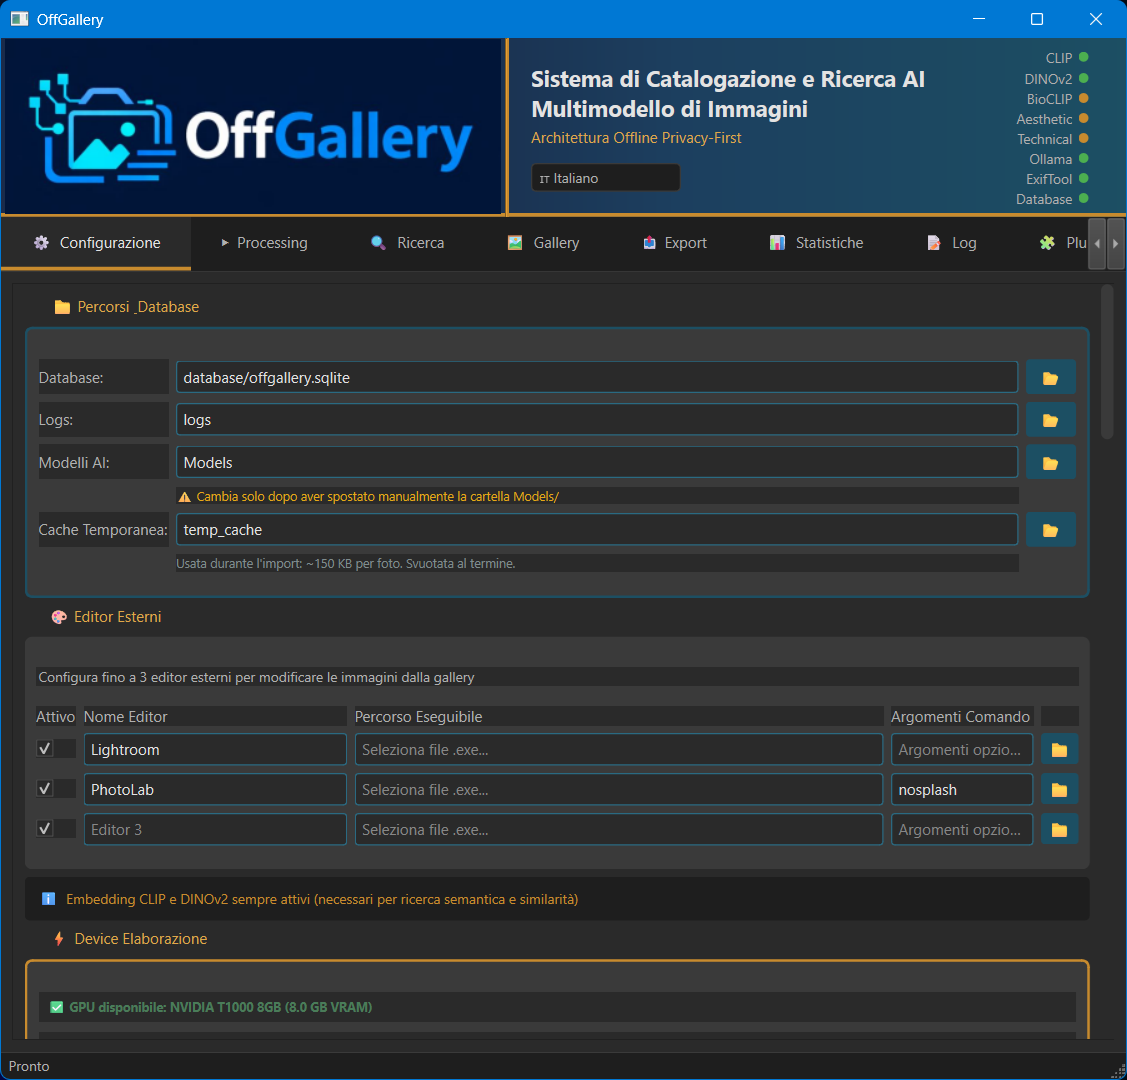
The Configuration tab lets you customise parameters for all AI models and application preferences. Settings are saved in config_new.yaml.
Section: LLM Connection
| Parameter | Description | Default |
|---|---|---|
| Backend | LLM plugin to use (Ollama, LM Studio) | Ollama |
| Endpoint | LLM server URL | Depends on selected plugin |
| Model | Model name | qwen3-vl:8b-instruct-q4_K_M |
| Timeout | Maximum seconds to wait for a response | 180 |
Section: Language
| Setting | Description |
|---|---|
| UI language | Language of menus and buttons (IT/EN/FR/DE/ES/PT) |
| LLM output language | Language in which the LLM model generates tags and descriptions (independent of the UI) |
You can have the UI in English and tags generated in Italian, or any other combination. Tag search adapts to the language of the content.
Section: External editor
Configure the path to your external photo editor (Lightroom, Capture One, etc.) to open original files directly from the Gallery.
Section: Per-Model Device Allocation
This section lets you assign each AI model to GPU or CPU individually. A table shows all models with their estimated VRAM usage and a GPU/CPU selector for each.
| Element | Description |
|---|---|
| Model table | Each row shows the model, estimated VRAM (~GB), and GPU/CPU selector |
| VRAM budget bar | Shows real-time total VRAM usage (models + LLM) vs available VRAM. Colour: green (≤80%), amber (≤95%), red (>95%) |
| LLM row | Shows VRAM used by the LLM model (Ollama/LM Studio), auto-detected or estimated from model name |
| Auto-optimize | Calculates optimal GPU/CPU distribution based on detected hardware, VRAM budget and LLM VRAM |
Heavy, slow models (CLIP, BioCLIP) benefit from GPU acceleration. Lightweight, fast models (DINOv2, MUSIQ) perform better on CPU because parallel threads don't serialize as they do on GPU. Auto-optimization accounts for this trade-off.
Changes to model device assignments require an application restart to take effect. A message next to the Auto-optimize button will remind you.
Section: AI Models
Path of the AI models directory (Models/). Can be relative to the OffGallery root or an absolute path (e.g. on a large external drive).
9bPlugins
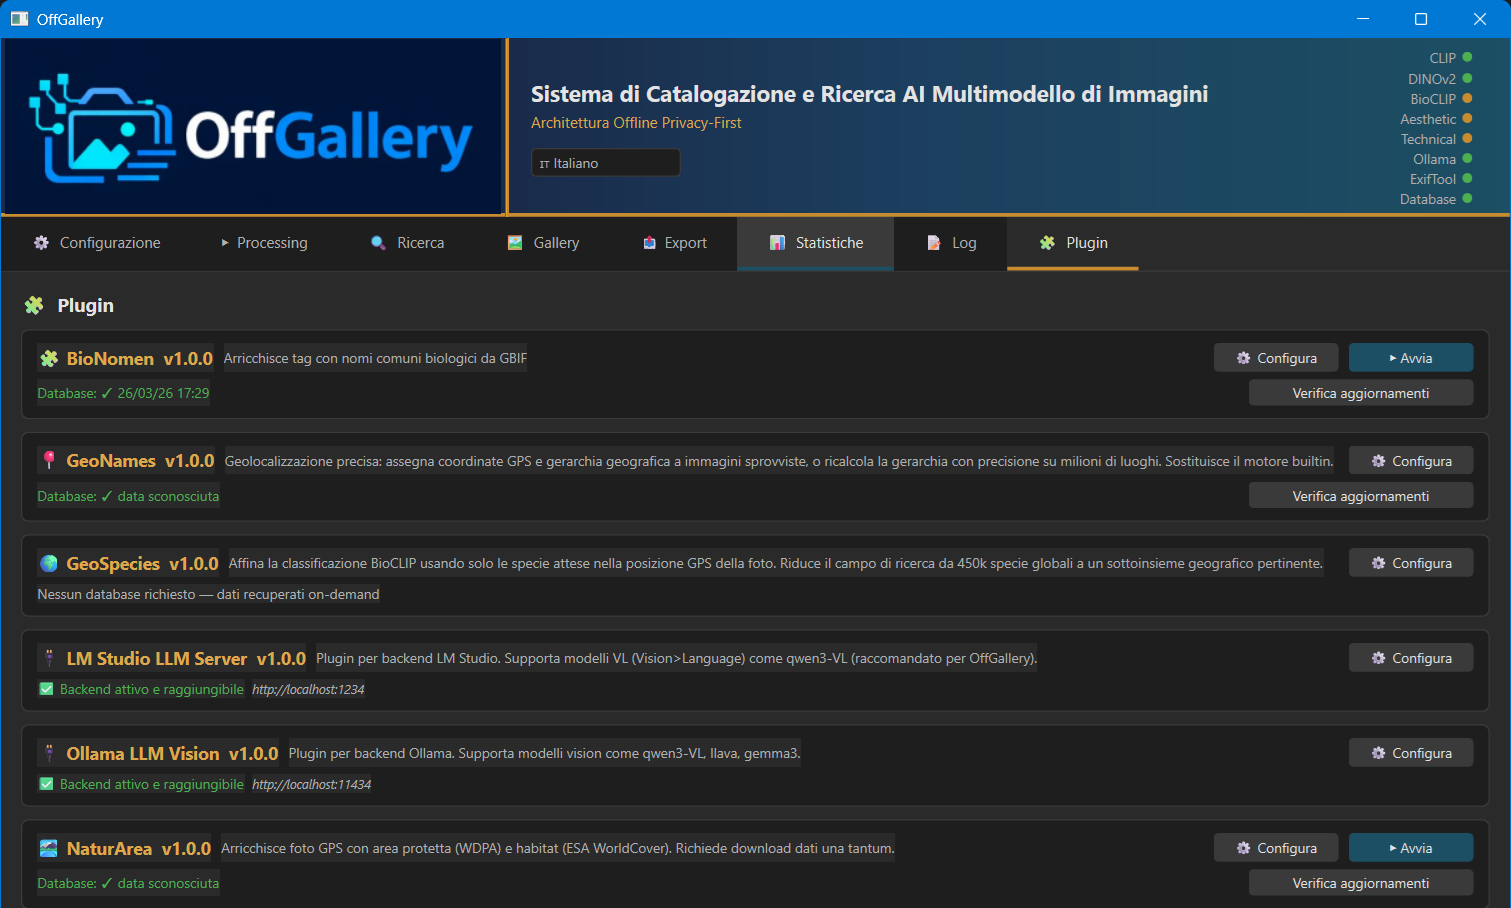
OffGallery includes an auto-discovery plugin system: plugins are detected automatically from the plugins/ folder at startup, with no manual configuration. Plugins fall into two categories: LLM (text generation) and Data (contextual enrichment).
Without any plugin installed, OffGallery works normally for all core features: CLIP semantic search, DINOv2 visual similarity, BioCLIP classification, aesthetic and technical scores, EXIF filters. Plugins add further capabilities but are not prerequisites.
9b.1 LLM Plugins — text generation
Enable automatic generation of tags, descriptions and titles via local LLM Vision models. Configured from the Configuration → LLM Connection tab.
| Plugin | Backend | Default endpoint | Notes |
|---|---|---|---|
| Ollama | Local Ollama | http://localhost:11434 |
Optimised for qwen3-VL, llava, gemma3. think=false support, timing diagnostics, automatic VRAM warmup/unload. Recommended for NVIDIA GPUs and Apple Silicon. |
| LM Studio | LM Studio server Plugin by Riccardo Merlotti |
http://localhost:1234 |
OpenAI-compatible API. AMD/DirectML support, lms CLI unload. Recommended for AMD GPUs or users who prefer a GUI for model management. |
Recommended models
| Model | Backend | VRAM required | Output quality |
|---|---|---|---|
qwen3-vl:8b-instruct-q4_K_M | Ollama | ~6 GB | Excellent — recommended |
qwen3-vl:4b-instruct-q4_K_M | Ollama | ~4 GB | Good — for GPUs with limited VRAM |
llava:7b | Ollama | ~5 GB | Decent |
qwen3-VL (any quantisation) | LM Studio | variable | Excellent |
Switching backends
- Open the Configuration tab
- In the LLM Connection section, select the backend from the dropdown
- Verify that endpoint and model are correct for the chosen backend
- Click Test Connection to verify
Switching LLM backends does not require an application restart. Tags and descriptions already in the database remain unchanged.
9b.2 Data Plugins — contextual enrichment
Enrich photos already in the database with additional information derived from GPS, date/time and BioCLIP taxonomy. Run from the Gallery (context menu) or in batch from the Processing tab.
| Plugin | Function | Requires | DB output |
|---|---|---|---|
| GeoNames | Full geographic hierarchy from GPS: Continent → Country → Region → City. Bundled GeoNames data, no API required. | GPS in photo | geo_hierarchy field. Enables Location filter and 4-state GPS filter in Search. |
| GeoSpecies | Restricts BioCLIP's search space to species biologically expected at the GPS location (GBIF/eBird data). Reduces from ~450k global species to a geographically relevant subset. Runs automatically during batch processing — not executable manually from the Gallery. | GPS + BioCLIP already run | Updates bioclip_taxonomy with a more precise classification. |
| NaturArea | Identifies whether the photo was taken in a protected area (WDPA database) and the habitat type (ESA WorldCover: forest, shrubland, grassland, urban, water…). | GPS | protected_area and habitat fields. Enables Habitat and Protected area filters in Search. |
| Weather | Retrieves historical weather conditions (Open-Meteo) at the exact time of capture: temperature, humidity, wind, precipitation, condition. | GPS + date/time + internet connection | weather_context field (JSON). Enables Weather condition filter in Search. |
| BioNomen | Adds common biological names in the configured language (GBIF, 6 languages). Example: Ardea cinerea → "Grey Heron" (EN), "Airone cenerino" (IT). | BioCLIP already run | vernacular_name field. Enables Common name filter with autocomplete in Search. |
Grid: data plugin combinations and prerequisites
| Plugin | GPS present | BioCLIP run | Internet | Result |
|---|---|---|---|---|
| GeoNames | ✅ Yes | — | No | Full geographic hierarchy written |
| GeoNames | ❌ No | — | — | Skipped — log warning |
| GeoSpecies | ✅ Yes | ✅ Yes | No | BioCLIP refined for geographic area |
| GeoSpecies | ❌ No | ✅ Yes | — | Skipped — GPS required |
| GeoSpecies | ✅ Yes | ❌ No | — | Skipped — BioCLIP required |
| NaturArea | ✅ Yes | — | No | Protected area + habitat detected |
| NaturArea | ❌ No | — | — | Skipped — GPS required |
| Weather | ✅ Yes | — | ✅ Yes | Historical weather conditions retrieved |
| Weather | ❌ No | — | — | Skipped — GPS required |
| Weather | ✅ Yes | — | ❌ No | Connection error — log warning |
| BioNomen | — | ✅ Yes | No (after first setup) | Common names added in configured language |
| BioNomen | — | ❌ No | — | Skipped — BioCLIP required |
9b.3 Prompt Context Plugin — LLM prompt customisation
The Prompt Context plugin injects a custom CONTEXT block into OffGallery's Vision-Language prompt, steering the model towards the archive's specific photographic domain. With no active preset the behaviour is identical to the standard OffGallery prompt.
Available presets
| Icon | Name | Domain |
|---|---|---|
| ⬜ | Standard | Standard OffGallery prompt — no additional context |
| 🦋 | Wildlife Archive | Species, habitat, animal behaviour — scientific photography |
| 🏔 | Landscape & Territory | Geomorphology, natural light, season, geographic context |
| 🔭 | Astrophotography | Celestial objects, constellations, atmospheric conditions |
| 🔬 | Scientific Macro | Extreme detail, microscopic structures, entomology |
| 🐠 | Underwater | Marine species, behaviour, visibility conditions |
| 📰 | Reportage & Documentary | Social context, visual narrative, historical documentation |
| 🛍 | Commercial & Product | Product, brand, visual communication, technical composition |
| 🌆 | Street & Urban | Urban life, architecture, ambient light, social interaction |
How to select a preset
- Go to the Plugin tab and click Configure ▸ on the Prompt Context card
- Select a preset from the list
- Click ✅ Activate — the preset becomes active for all subsequent processing
- To revert to the standard prompt, select ⬜ Standard and press Activate
The active preset is shown next to the card in the Plugin tab and in the Prompt context dropdown in the Processing tab. Settings are remembered across sessions.
User presets
Custom presets can be generated using the local LLM model configured in OffGallery:
- In the Configure dialog, expand the Generate new preset section
- Describe the photographic domain in the text field (e.g. "freshwater underwater photography archive, focusing on invertebrates and algae")
- Click Generate — the LLM model creates an optimised CONTEXT block
- Review the generated text, give the preset a name and click Save
User presets are marked with ★ in the list and can be deleted with the 🗑 Delete button. Built-in presets cannot be deleted.
From the Gallery context menu (right-click a photo → Generate with LLM) you can select a different preset for that specific run without changing the global active preset.
9b.4 Beta access and installation
During the beta testing period all plugins are distributed free of charge on request. Write to offgallery.ai.info@gmail.com stating:
- Operating system (Windows / Linux / macOS) and version
- System RAM
- GPU (model and VRAM) — or "CPU only" if you have no dedicated GPU
- Plugins requested (LLM: Ollama or LM Studio; data plugins: list which ones)
The address will be used solely to send the plugins and for update notifications — no other purpose, no sharing with third parties.
Installing a plugin (from zip)
- Extract the zip contents into the
plugins/folder of your OffGallery installation. - The resulting structure should be:
plugins/ └── plugin_name/ ├── manifest.json └── plugin_name.py (or the main file indicated in the manifest) - Restart OffGallery — the plugin is detected automatically. The Log panel confirms loading.
Make sure you extracted the plugin zip into the correct folder and that the folder structure shown above is respected.
BioNomen — species database setup
The species database must be downloaded by selecting the taxa of interest (internet required only once):
- Start OffGallery
- Go to the Plugin tab and click Configure in the BioNomen card
- Select the taxa of interest (Aves, Mammalia, Reptilia, Amphibia, Insecta, Plantae)
- Click Download database
10Log Tab
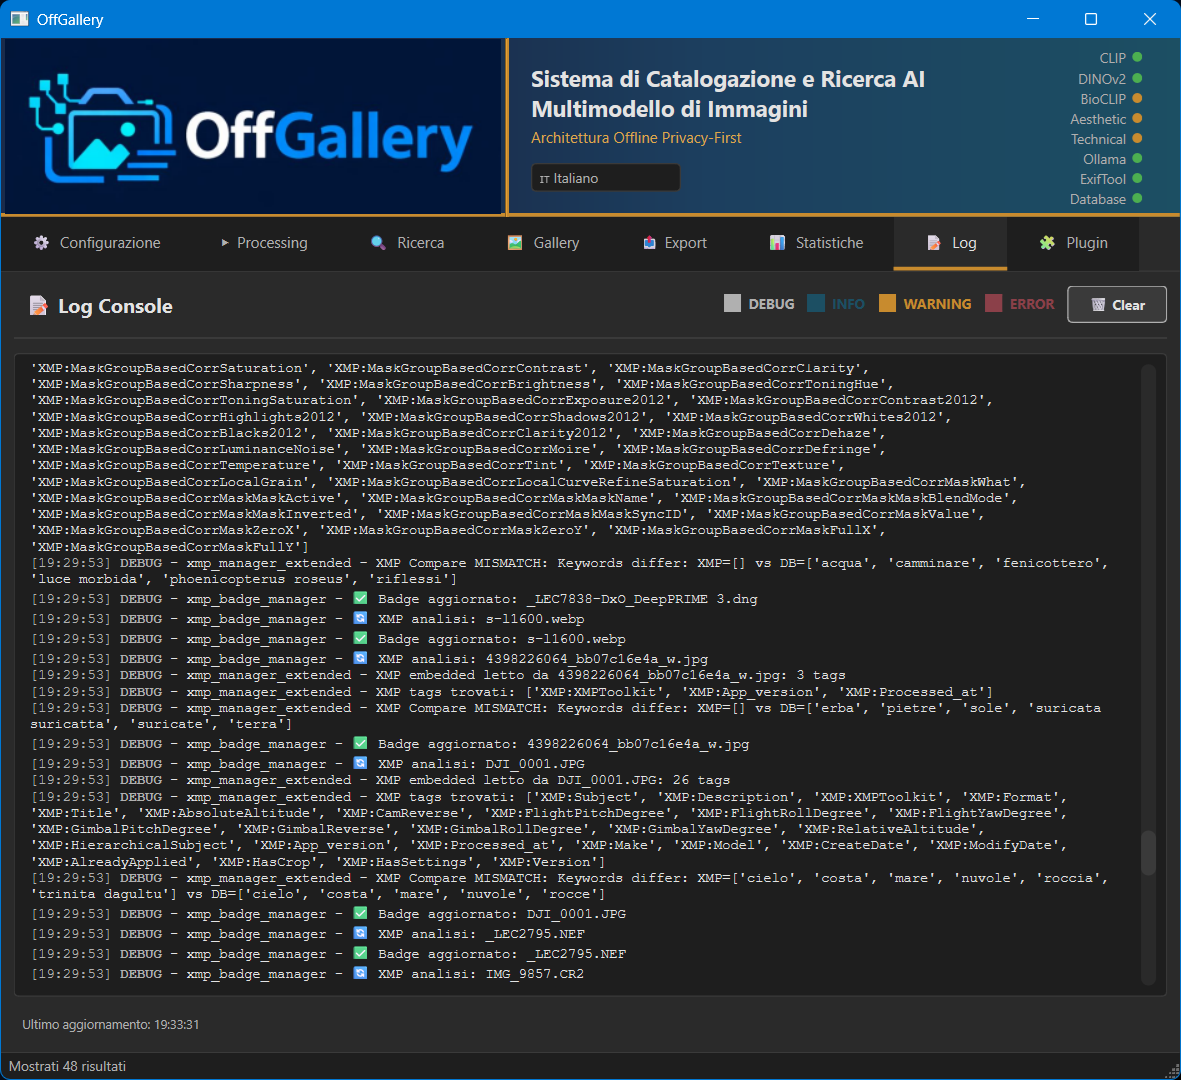
The Log tab is the application's centralised monitoring panel. It captures in real time all messages produced by any module — including print() and stderr output — and displays them in a scrollable text area with colour-coded syntax.
Log content
- Application startup logs (loaded from the splash screen, in a
═══ STARTUP LOG ═══section) - Each file being processed: current operation (EXIF, CLIP/DINOv2 embedding, BioCLIP, LLM, geotagging, aesthetic/technical score)
- WARNING messages for unprocessable files (RAW without extractable preview, Ollama timeout)
- ERROR messages with technical details for troubleshooting
- System and configuration messages when settings change
Line format
[HH:MM:SS] LEVEL - module.name - message
Available controls
| Control | Function |
|---|---|
| Checkbox DEBUG | Show/hide detailed debug messages (very verbose, useful for diagnosis) |
| Checkbox INFO | Show/hide normal informational messages (ongoing operations) |
| Checkbox WARNING | Show/hide warnings (skipped files, out-of-range parameters) |
| Checkbox ERROR | Show/hide critical errors. Also covers CRITICAL level messages |
| Button 🗑️ Clear | Clears the log from both the display and memory |
The log keeps at most 500 lines in memory. Older entries are automatically removed to prevent performance degradation during long processing runs.
Click in the text area, press Ctrl+A to select all, then Ctrl+C to copy. Paste the text into a GitHub issue or support message to provide the full technical context.
11BioCLIP Biological Taxonomy
BioCLIP2 is a Vision model specialised in biological species recognition. It was trained on ~450,000 Tree of Life species and produces a full 7-level taxonomic classification:
Kingdom › Phylum › Class › Order › Family › Genus › Species
  e.g.: Animalia › Chordata › Aves › Pelecaniformes › Ardeidae › Ardea › Ardea cinerea
Where taxonomy appears
- Gallery (tooltip): separate "Taxonomy" section, distinct from tags
- XMP export: as
HierarchicalSubjectwith prefixAI|Taxonomy|... - Database: dedicated
bioclip_taxonomyfield (never mixed with tags)
The Latin species name (e.g. Ardea cinerea) is inserted programmatically by OffGallery — it is never asked of the LLM, which frequently makes errors with scientific names. The LLM uses the name as context but does not generate it.
12Offline Geotagging
OffGallery converts GPS coordinates into a readable geographic hierarchy in the format:
GeOFF | Europe | Italy | Sardinia | Trinità d'Agultu
In XMP export it appears as HierarchicalSubject with prefix GeOFF|, visible in Lightroom as a separate hierarchy from user keywords. The leaf node (e.g. Trinità d'Agultu) is automatically added as an image tag.
12.1 Geolocation engine
OffGallery includes two alternative engines:
| Engine | Coverage | Precision | How to activate |
|---|---|---|---|
Built-in (reverse_geocoder) |
~130,000 cities worldwide, bundled | Municipality/city level — does not recognise hamlets or suburbs | Active by default, no configuration needed |
| GeoNames plugin | Millions of places for downloaded countries: cities, hamlets, suburbs, villages, natural areas | High — identifies individual hamlets and suburbs | Install the GeoNames plugin and download data for the desired countries |
When the GeoNames plugin is installed and configured, it automatically replaces the built-in engine during batch processing and gallery actions.
12.2 GeoNames plugin — setup and usage
The GeoNames plugin provides precise geographic hierarchies down to hamlet and suburb level, and lets you manually assign GPS coordinates to photos that have none (e.g. scanned slides, archive photos).
Installation and first run
- Open Config Tab → Plugin → GeoNames.
- Select one or more countries from the list and click Download country. The download is a one-time operation and requires no subsequent internet connection.
- The plugin is ready: from the next batch run it will use the local database instead of the built-in engine.
Batch processing modes
| Mode | Behaviour |
|---|---|
| Geotag: all photos | Recalculates the hierarchy for all images with existing GPS |
| Geotag: no-GPS photos only | Assigns the configured default location to images without coordinates |
Manual location assignment
For photos without GPS (slides, scans, archive photos) you can assign a location in two ways:
- Direct coordinates: type decimal latitude and longitude (e.g.
41.052340,8.947590). The corresponding hierarchy is calculated in real time and shown as a preview. - Search by name: type the place name in the search field. The database includes hamlets, suburbs and small villages — not just main towns. Double-clicking a result sets the coordinates and preserves the exact hierarchy of the chosen locality (without reverse geocoding, which would return only the municipality).
The confirmed location is saved as the default and pre-filled the next time the dialog is opened.
Gallery actions
Select one or more photos in the Gallery and open the context menu (right-click → GeoNames):
| Action | Description |
|---|---|
| Assign location… | Opens the dialog to set GPS and hierarchy on selected photos. Supports typing coordinates directly or searching by name. Overwrite checkbox to also act on already-georeferenced photos. |
| Recalculate GPS hierarchy | Recalculates geo_hierarchy from existing coordinates using the local GeoNames database. Useful after downloading a new country or updating the database. |
| Clear GPS data | Removes the geographic hierarchy and derived data (weather, protected area, habitat). GPS coordinates are kept in the database. |
Photos that have been assigned a location manually (not read from the file's EXIF) can be identified in the search GPS filter with the state "GPS manually modified". Coordinates are written to the OffGallery database only and do not modify the original file.
13XMP Sync State
OffGallery tracks the synchronisation status of each image with its XMP file:
| State | Meaning |
|---|---|
PERFECT_SYNC | The XMP file exists and is up to date with the database content |
DIRTY | The database was updated after the last XMP export — the XMP file is stale |
NO_XMP | No XMP file has been exported yet for this image |
XMP_NEWER | The XMP file was modified externally (e.g. by Lightroom) after the last import |
14Multilingual Support
OffGallery manages three independent language levels:
- UI language: buttons, menus, labels (6 languages: IT, EN, FR, DE, ES, PT)
- LLM output language: language in which the model generates tags and descriptions (separately configurable)
- Query language: search queries are automatically translated offline via Argostranslate — you can search in English even if tags are in Italian
15FAQ — Frequently Asked Questions
Ollama is not responding / timeout
Check that Ollama is running. On Windows: look for "Ollama" in the system tray. On macOS/Linux: run ollama list in a terminal. Make sure the configured model is downloaded (e.g. ollama pull qwen3-vl:8b-instruct-q4_K_M).
Generated tags are in Italian but I want English
Go to Configuration → LLM output language and select "English". Then use "AI Gen. Only" to regenerate tags for all photos already in the database.
Semantic search is not finding relevant photos
SigLIP embeddings may have been generated with an incompatible library version, or the database may contain old CLIP embeddings (768 dimensions) incompatible with SigLIP (1152 dimensions). Reprocess photos with "Reprocess all". On Windows and Linux reinstall using the wizard (OffGallerySetup.exe or OffGallerySetup); on macOS see installer/INSTALL_GUIDE_EN.md for version requirements.
A RAW file is not being processed
Some high-efficiency RAW formats (e.g. NEF with lossless compression) do not contain an extractable JPEG preview. In these cases OffGallery saves EXIF metadata but skips embeddings and LLM. Check the Log tab for details.
How do I update OffGallery?
Download the new ZIP from GitHub and extract it over the existing folder. Your data (database/, INPUT/, cache/) is not included in the ZIP and remains untouched. If you installed with git clone, just run git pull from the OffGallery folder.
Can I use a different LLM model or backend?
Yes. In Configuration you can select a different backend (Ollama or LM Studio) and change the model. Tested with Ollama: qwen3-vl:8b-instruct-q4_K_M (recommended), qwen3-vl:4b-instruct-q4_K_M, llava:7b, minicpm-v. With LM Studio: qwen3-VL (recommended). Best results with multimodal vision models.
How do I switch to LM Studio?
Install LM Studio, download a vision model (recommended: qwen3-VL) and start the server. In OffGallery, go to Configuration and select LM Studio: the endpoint updates automatically to http://localhost:1234. Enter the model name and click Test. No manual file editing required.
Does LM Studio work with NVIDIA GPUs?
Yes. LM Studio automatically detects NVIDIA GPUs and uses CUDA. No extra configuration needed. LM Studio is especially useful for AMD GPU users (DirectML support), where Ollama doesn't work well. With NVIDIA, both backends work equally well.
Do I need to reconfigure the LLM backend after updating?
No. If you were using Ollama, it continues to work automatically. The system detects Ollama as the default backend even if your configuration file doesn't have the backend entry yet. The backend selector appears in the Configuration tab only for those who want to switch.
BioCLIP data appears as keywords in Lightroom
This is expected behaviour. They appear as a separate AI > Taxonomy > ... hierarchy in Lightroom's keyword structure. They do not interfere with your own keywords.
16Troubleshooting
| Issue | Likely cause | Solution |
|---|---|---|
| SigLIP scores always near zero | Old CLIP embeddings (768 dim) in the DB, or wrong transformers version | Reprocess photos with "Reprocess all" to regenerate SigLIP embeddings (1152 dim) |
| Wrong geotagging (incorrect city) | GPS West longitude not interpreted correctly (older versions) | Reprocess photos with version ≥ 10 Mar 2026 |
| App starts but window does not appear (macOS) | Qt/Cocoa segfault on first launch | Use the updated launcher that downloads models in a separate process |
| Error "mat1 and mat2 shapes cannot be multiplied" | transformers version incompatibility with CLIP ViT-L/14 | Install pinned versions: transformers==4.57.3 huggingface-hub==0.36.0 open-clip-torch==3.2.0 |
| XMP import does not import some tags | Tags with prefix AI|Taxonomy| or GeOFF| are intentionally filtered |
This is correct behaviour. These tags are managed internally by OffGallery. |
| Conda not found on launch (macOS) | Wrong Miniconda architecture (x86_64 on Apple Silicon) | Reinstall Miniconda with arm64 architecture. See README Installation section. |
Report issues and feature requests on GitHub Issues. Announcements and discussions on GitHub Discussions.
17Uninstalling
Windows: OffGallerySetup.exe does not include an automatic uninstaller. Removal is done manually in two steps: removing the conda environment and deleting the application folder. Linux/macOS: same procedure — an extracted folder with an associated conda environment.
Export any important metadata via Export Tab → Export XMP or Export CSV if you want to keep tags, descriptions and ratings you have already generated.
Windows
- Open the Anaconda Prompt from the Start menu.
- Remove the conda environment:
conda deactivate conda env remove -n OffGallery - Delete the application folder (e.g.
C:\OffGallery-mainor wherever you extracted it) via File Explorer or from the prompt:rmdir /s /q C:\OffGallery-main - If you created a Desktop shortcut, delete it manually.
macOS
- Open Terminal.
- Remove the conda environment:
conda deactivate conda env remove -n OffGallery - Delete the application folder (e.g.
/Applications/OffGallery-main):rm -rf /Applications/OffGallery-main - Remove any configuration files in your home directory:
rm -rf ~/.offgallery
Linux
- Open a terminal.
- Remove the conda environment:
conda deactivate conda env remove -n OffGallery - Delete the application folder:
(replace with the actual path where you extracted the app)rm -rf ~/OffGallery-main - Remove any configuration files:
rm -rf ~/.offgallery
What remains after uninstallation
| Item | Location | Removed by the steps above? |
|---|---|---|
Conda environment OffGallery | ~/miniconda3/envs/OffGallery/ | Yes — conda env remove |
| Application folder | Where you extracted it | Yes — removed manually |
| Image database | Inside the app folder (database/) | Yes — removed with the folder |
| Downloaded AI models | Inside the app folder (Models/) or custom path set in config_new.yaml | Only if inside the app folder; otherwise remove manually |
| HuggingFace cache | ~/.cache/huggingface/ (Linux/macOS) · %USERPROFILE%\.cache\huggingface\ (Windows) | No — remove manually if desired |
| Miniconda / conda itself | ~/miniconda3/ | No — conda remains installed for other environments |
| XMP sidecar files | Next to your original photos | No — these are your data and are never touched |
On first launch, SigLIP and DINOv2 models are downloaded from HuggingFace and saved both in Models/ (inside the app folder) and in the HF cache. The cache can occupy several GB. To remove it:
- Linux / macOS:
rm -rf ~/.cache/huggingface/ - Windows: delete the folder
%USERPROFILE%\.cache\huggingface\via File Explorer
If you have other projects using HuggingFace, remove only the subfolder hub/models--HEGOM--OffGallery-models instead of the entire cache.
If you set an absolute path for AI models in config_new.yaml (e.g. E:\MyModels), that folder is not removed automatically. Delete it manually if you no longer need it for other projects.
18Reinstalling
If you have removed OffGallery and want to reinstall it from scratch, follow these steps in order to avoid conflicts with leftovers from the previous installation.
If you have data to keep (tags, descriptions, ratings), export them before removing the old installation via Export tab → Export XMP or Export CSV.
1. Make sure the old installation is fully removed
Check that no leftovers from the previous installation remain:
- Application folder: make sure the OffGallery folder (e.g.
C:\Users\name\OffGalleryor wherever you installed it) has been deleted. If it still exists, remove it manually before continuing. - Conda environment: open Anaconda Prompt from the Start menu and check:
Ifconda env listOffGalleryappears in the list, remove it:
A corrupted environment left over from the old installation can cause errors in the new one too.conda env remove -n OffGallery
Windows — clean reinstall with Miniconda already present
If Miniconda is already installed and working, you can proceed directly:
- Download the new
OffGallerySetup.exefrom the website — do not reuse a previously downloaded installer. - Run the installer. If Windows shows an "Unrecognized app" warning (SmartScreen), click More info → Run anyway: this is normal for apps without a digital signature.
- The wizard will detect Miniconda already present and only create the new
OffGalleryenvironment.
Windows — full reinstall from scratch (including Miniconda)
- Uninstall Miniconda from Control Panel → Programs.
- Download the new
OffGallerySetup.exefrom the website. - Run it: it will install Miniconda, create the
OffGalleryenvironment and download all AI models (~8 GB).
Linux — reinstall
Download the new OffGallerySetup (Linux binary) from the website, make it executable and run it:
chmod +x OffGallerySetup
./OffGallerySetup
macOS — manual reinstall
On macOS there is no graphical installer. Follow the steps in installer/INSTALL_GUIDE_EN.md bundled with the application. In brief:
- Download the latest source archive from GitHub Releases and extract it.
- Open Terminal and run the setup script:
bash installer/install.sh - The script will create the
OffGalleryconda environment and download the AI models.
If you kept the Models/ folder from the old installation, copy it into the new app folder and point to it in Config → Models directory to avoid re-downloading ~8 GB.
OffGallery · User Manual v1.0 · April 2026 · github.com/HEGOM61ita/OffGallery · Credits & licenses